Showing posts with label Stamping 411. Show all posts

Tuesday, July 24, 2012

Blooming with Kindness or Field Flowers?

Here are a couple of cards I made while trying to come up with something for my stamp a stack using this week's Stamping 411 challenge.  I started with the bottom layers on the second card (Island Indigo base, and very vanilla sponged with soft suede) with the embossed flower from the top card.  I did NOT like the soft suede with that flower at all.  So I started over and didn't sponge any soft suede.  Definitely liked how the top card turned out.  Well, I couldn't let the other paper go to waste, so I though I'd use a different stamp and put some soft suede in it.  Yup, I like that one too.  Now to decide which one to use for my stamp a stack, so I put it to a vote in my house. lol  Everyone chose the second card, so that's the one I'm doing...less prep time for me too! :)


Thanks for looking and have a great day!

Stamp Sets:  Blooming with Kindness & Field Flowers
Card Stock:  Island Indigo & Very Vanilla
Classic Stampin' Pads:  Island Indigo & Soft Suede
Versa Mark
Stampin' Emboss Powder:  White
Punch:  Scallop Trim Border
Embossing Folder:  Fancy Fan
Ribbon:  3/8" Ruffled in Island Indigo & 1/2" Seam Binding in Very Vanilla
Shimmer Paint:  Champagne Mist

Wednesday, July 4, 2012

It's Independence Day!

Happy 4th of July and Happy Birthday to a friend and fellow stamper who gives out many, many cards each month to let people know she's thinking about them.  I love that I can make a red, white and blue card special for her just like she does for so many other people.  I dropped it off last night (just after 9 pm at her front door), so I hope she ends up finding it! lol  I didn't want to knock on the door so late in the evening.  I saw the Stamping 411 Saturday sketch challenge here and thought it would make a cute card for a 4th of July birthday.


Thanks for looking and have a great day!

Stamp Set:  Just Believe
Card Stock:  Real Red, Whisper White & Night of Navy
Classic Stampin' Pads:  Real Red & Night of Navy
Embossing folder:  Perfect Polka Dots
Punches:  Modern Label, Word Window,
Scallop Trim Border & Boho Blossoms
Sizzlit:  Little Leaves
Ribbon:  5/8" Organza in Whisper White & 3/8" Taffeta in Real Red
Basic Jewels:  Pearls
Shimmer Paint:  Champagne Mist


Monday, May 7, 2012

Cherry Cobbler Carnation

* I've added instructions at the bottom of this post on how to make carnations *

Well, carnations are my favorite kind of flowers and today's card was inspired by a red carnation my daughter gave me when she stopped by to visit last week...how sweet was that! :)  I figured this flower would be perfect for this week's sketch challenge from Stamping 411 because of the flower on the front of the sketch challenge.  I hope you enjoy the card...and the flower too. :)


I had to show the actual flower too, just couldn't get a very good pic. :(


Thanks for looking and have a great day!

Stamp Sets:  Elements of Style & On Your Birthday
Card Stock:  Basic Black, Cherry Cobbler & Whisper White
DSP: Mocha Morning
Ink:  StazOn Black
Ribbon:  1/2" Seam Binding in Cherry Cobbler
Scissors:  Deckle
Shimmer Paint:  Champagne Mist
Circle Scissor Cutter


First I cut out 6 circles.  My biggest one was 3 ½, then 3 ¼”, 2 ¾”, 2 ¼”, 2” and 1 ¾”.  If you want a smaller flower just start with a smaller circle.  I then cut around the edges with a deckle scissors (Stampin’ Up! sold these a long time ago).  When I cut the four biggest circles I didn’t just cut around the circle I weaved in out a bit.  Kind of like a wave going around the circle.  The last two I didn’t weave back and forth, just cut as close to the edge as possible.  


For the red carnation I sponged just a tinge of the edges with StazOn black ink so the ink doesn’t run. I did this sample with Stampin' Up!'s Classic Stampin' Pad in Marina Mist because I wanted it to run into the Whisper White.  Do it on both sides!


I then make sure I have a few layers paper towels and spray each of the flower pieces with water to get them wet...dab off the extra water.  


Next I crinkle crinkle all the pieces.  Note that if you're using Whisper White or Very Vanilla the card stock is not as thick as the rest of Stampin' Up!'s card stock.  The Cherry Cobbler does not rip as easily as the other two, so handle the lighter card stock with care.  


Now carefully open it back up and straighten the edges as best as you can, but don't pull too hard.  Now let it dry...or dry it with the heat gun because you're too impatient like me! lol  Notice how the ink bled.  You want that!


The final step before putting it together is to use your paper piercing tool to split each piece you have (yes, this is a little tedious, but your patience will pay off!), so you now have two of every piece making twelve pieces.  


Now you just layer them with the biggest on the bottom all the way to the top making sure you vary where the edges are at.  


Once you have them in place on the paper piercing mat use your paper piercing tool to put a hole through all of the layers.  Put a brad through it and close it.  


Now starting with the smallest piece in the middle pull it all up and pinch the piece together.  Do this with every piece. 


The final step is to pull the pieces back to your liking.  And if you like sparkle add a little spritz of Champagne Mist Shimmer Paint.  Hope the instructions were simple and you enjoy making carnations of your own!


Sunday, May 6, 2012

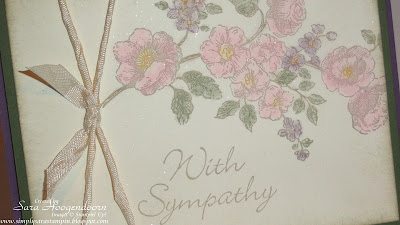
RHSSC 35 - With Sympathy

It's Sunday and that means it's time for another Red Hot Stamper's sketch challenge.  I must say this challenge threw me a little! lol  I happened to see Stamping 411's Color Inspiration #170 post and decided to use their colors.  Then I needed to figure out what stamp set to use.  Well, I needed something big to cover the open side.  Ok, I got that part figured out, but then what to do for ribbon???  I didn't have any that was skinny enough to look good on what I had already done.  That's when I came up with the idea to twist the seam binding ribbon to make it smaller.  Voila!  I managed to come up with this pretty card.  I loved the soft colors and thought I would make it a sympathy for a fellow demonstrator who just lost a loved one.  


If you're in a crafty mood why not give our challenge a try.  You can head  here to see a few other samples too.


Thanks for looking and have a great day!

Stamp Set:  Elements of Style
Card Stock:  Perfect Plum, Always Artichoke & Very Vanilla
Classic Stampin' Pad:  Sahara Sand
Stampin' Pastels:  Perfect Plum, Always Artichoke, 
Pink Pirouette & So Saffron
Ribbon:  1/2" Seam Binding in Very Vanilla
Shimmer Paint:  Champagne Mist

Thursday, March 15, 2012

SSC246

I've been working on this card for a few days hoping I'd get it done in time to enter it into this week's Stamping 411 Saturday Sketch Challenge.  I guess trying to start up a web page for someone is more work than I thought! lol  I'm giving it my best shot, but needed to stamp a bit in between to take a break. :)  


Thanks for looking and have a great day!

Stamp Set:  Fabulous Florets
Card Stock:  Melon Mambo, Coral Calypso & Whisper White
Classic Stampin' Pads:  Melon Mambo, Coral Calypso & Wild Wasabi
Punches:  Word Window,  Modern Label & Scallop Trim Border
Ribbon:  3/8" Taffeta in Whisper White
Stampin' Embossing Powder:  White
Shimmer Paint:  Champagne Mist

Thursday, August 18, 2011

Beautiful Wings

Today's card is for a couple of challenges that I really wanted to do, and I thought the design and colors would go together perfectly.  I used Stamping 411's sketch challenge for the design and The Friday Mashup for the colors, butterflies and bling.  


Thanks for looking and have a great day!

Card Stock:  Perfect Plum, Marina Mist, Wild Wasabi & Whisper White
Classic Stampin' Pads:  Perfect Plum & Marina Mist
Embossing Folder:  Vintage Wallpaper
Embosslits:  Beautiful Wings
Punch:  1 3/4" Scallop Circle
Jewels:  Basic Rhinestones
Shimmer Paint:  Champagne Mist
Crimper for leaves


Monday, June 13, 2011

Purple Clematis

Here is my second clematis flower card that I said I would put on...with instructions at the bottom. :)  I loved making them, but they were a little bit of work!  I made this one as an anniversary card for my mom and dad and used Saturday Sketch Challenge 207 from Stamping 411 for my design...although I did have to make the card 5 1/4" x 51/4" to fit the flower.  Here is the flower that I got my inspiration from and Stamping 411's sketch challenge...


A picture of the whole card.


A close up of the clematis...nope, they don't have sparkles, but I like to add it anyway. :)


...and the inside with a little bit of embossing in here too.


Thanks for looking and have a great day!

Stamp Sets:  On Your Birthday & a retired Happy Anniversary stamp
Card Stock:  Elegant Eggplant, Marina Mist, Garden Green, Rich Razzleberry & Whisper White
Classic Stampin' Pads:  Elegant Eggplant, Marina Mist, Garden Green & Rich Razzleberry
Punches:  Blossom Petals (indirectly) & Decorative Label
Embossing Folder:  Elegant Bouquet
Ribbon:  5/8" Grosgrain in Marina Mist

Here are step-by-step instructions on how to make the flower with a few tips first.  I found that Whisper White does not hold it's shape as well because it's a thinner card stock.   I still used it, but it will tear easier so you'll  need to be careful especially when trying to get the ruffled edge look.  I also wanted my petals bigger so I traced them, then enlarged them and printed them out on my cardstock. You don't have to do that, I just wanted mine a little bigger. :)  

You need to punch (Blossom Petals) or cut out eight petals.


 Take your mat pack (you need the cushion underneath) and using your paper-piercing tool run a few lines down the center of your leaf.


I used an older, small (and dull!) pair of scissors to curl the leaf up just like you do to make ribbon curly for a present.  I would start at the bottom of the petal and pull it to the top, repeating it until I got the look I wanted.


Now it's time for sponging.  For the white clematis petal I pinched a sponge until it was nice and thin so I could get a small stripe down the middle and not anywhere else on the petal.  Note:  When I sponged the white petal I had the side that I used the paper-piercing tool on facing up, but on the blue/purple petals I wanted them bumping up so I turned it over. :)


 I sponged the outside of the petal first...


then did the middle, pressing and dragging from the bottom of the petal to the top.  If the groves don't stand out, use your piercing tool again because you want the stripes down the middle to be noticeable.


This is what they should look like when you have eight of them done. :)


Next I punched out a 1/2" circle, then a 1" circle and sponged it to match the petals.


I attached the petals using adhesive.  You can use whatever you're comfortable with.  I just didn't want to use any sort of glue for this part because the petals would slide all over for me. :(


Once you have the petals where you want them, use your paper piercing tool to poke holes all around the center of your flower...


turn it around and pierce some more if necessary and then pull it out so you have about a 1/2" hole.


I cut a piece of rich razzleberry card stock 7" x 1 1/2" and made close cuts around 1/2" long.  I also added a small Whisper White piece to make it as close to the real flower as possible.  Make sure you add it on the correct side to get the right effect.


After I got all the slits cut in I trimmed it down a little and added adhesive.


I used the paper-piercing tool to start folding it in keeping it tight!  Sorry, guess I don't have a picture of that. :(  I did not start on the end that has the white.  I wanted that on the outside.  


It should look something like this when you are done. 


You need to fan some of the outer pieces out...


and push the inside down so it folds in a little.


It should fit right in the hole you put in your flower. :)


Turn it upside down and glue.  I used the multipurpose liquid glue (Tombow) and let it dry over night.


To make the leaves you use the same size piece as you did for the petals.


Use the mat and paper-piercing tool to draw the veins on the leaves.


Turn it over and sponge around the edges and over the "veins" to get this look.


Cut a few thin strips of card stock, sponge them a little and curl them with your scissors.


Now put everything on your card however you think it should look and viola! you'll have a clematis!  

I hope you enjoyed looking over my instructions.  It's a little bit of work to make, but after you've done it once, it's not so hard to do the second time around. :)  Find a picture of a clematis that has colors you really like and give it a try!