Showing posts with label Brayer. Show all posts

Friday, January 20, 2017

If You Dream It... ~ with Fun Stampers Journey

Hey Everyone...I'm back from Vegas and have been running like crazy ever since!  I guess playing catch up is not my thing! lol  
I have to say I had a GREAT time at Fun Stampers Journey Leadership Conference!  If you ever want to be a part of a great company, let me tell you this is one that you will love!  Richard and Gabby Garay (the co-founders) are great people who love their coaches and show it!  I can't say enough about their generosity to all of us while we were at Leadership!  If you're thinking of joining I'd love to have you on my team!!

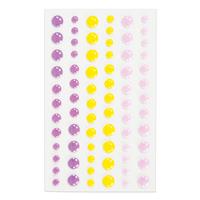
And now on to a card that I created for my upline's meeting last night.  She sent everyone in her downline candy dots and asked us to create a card or project with them.

This is one of the cards I created using the candy dots and it's going to sit on my desk to inspire me to dream big! :D


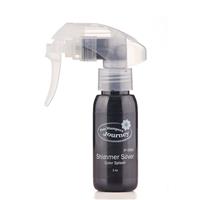
Wow...shimmer much? lol  Ok, it is shimmery, but not this much. 


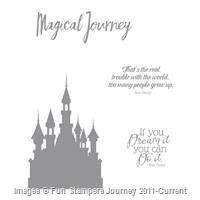
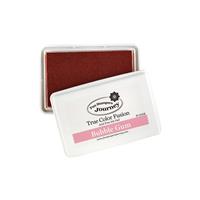
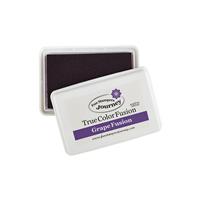
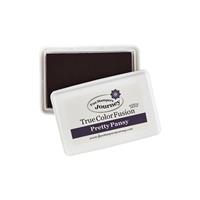
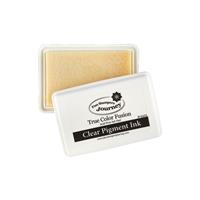
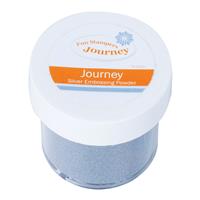
I created the background using my brayer.  I started with Bubble Gum ink and brayered it over the whole piece of card stock, then I added Watermelon Fusion.  You can see where the darker pink stops in the moon.  After I did those two colors I put a circle cut out of scrap paper on to create the moon, then brayered on Grape Fusion and finally Pretty  Pansy.  After I was done with the brayer I carefully took the "moon" off and spritzed the brayered background piece with Journey Silver Splash. Next I used Clear Pigment Ink and stamped the castle and words, then embossed them in silver.  The last step was to assemble the card and put on the finishing touch...the candy dots. 


Thanks for looking and have a great day!
Sara

I would love to be your Journey Coach! If you are thinking about joining 
Fun Stampers Journey and would like to be a Journey Coach click 
"Join My Team". 
I'd love to have you join me on my journey!  

If you like what you see and want to order just click on the 
"Shop Now" tab at the top of my blog. 

 If you have questions feel free to contact me. 
Just click "Contact Me" at the top of my blog . 

Monday, October 31, 2016

Happy Halloween! ~ A Fun Stampers Journey Card

Just a very short post for you late in the day!  I said I was only going to do one Halloween Card, but I did manage to get a second one done.  I wanted to give the brayer from Fun Stampers Journey a try.  I don't think it turned out too bad.  Of course with all the dark colors I'm not sure how I could mess it up! lol


All of the background colors except the hills at the bottom were put on with the brayer.  I sponged the hills so the house didn't look like it was floating around. lol


Thanks for looking and have a great day!
Sara

I would love to be your Journey Coach! If you are thinking about joining 
Fun Stampers Journey and would like to be a Journey Coach click 
"Join My Team". 
I'd love to have you join me on my journey!  

If you like what you see and want to order just click on the 
"Shop Now" tab at the top of my blog. 

 If you have questions feel free to contact me. 
Just click "Contact Me" at the top of my blog . 

Supplies used on this card


Stamp Sets:


Card Stock:


Ink Pads:


Supplies:


Sunday, February 14, 2016

Serene Silhouettes in the Night Sky

I made today's card just because.  That's right!  Just because I saw a picture that inspired me.  I loved the stars in the sky and the colors blended together in the picture along with the silhouette of one main tree and some bushes so that's what I tried to recreate with this card.  I have no idea what I'll use it for yet.  Guess I'll just have to wait for the right occasion to come along.


I started by flicking liquid frisket on a piece of white card stock and waited for it to dry.  Ha ha...I definitely did NOT wait...I used the low setting on my heat gun and dried it very fast!  Then I used my brayer to add the colors of the sky.  I started with Crushed Curry on the bottom and brought it about half way up.  Then from the top I brayered Watermelon Wonder, Real Red, Blackberry Bliss and finally Elegant Eggplant making sure to not go down as far as the last color so none of the colors were covered up.  Then I stamped the tree and "bushes" (really the top of the tree) using the Basic Black Archival Stampin' Pad.  This is the first time I used this ink pad other than at convention in July and I have to say I was impressed!!  It went on dark and evenly and that's exactly what I was looking for. The last bit of color was at the bottom that needed to be filled in nice and dark.  I used a sponge and started to rub it back and forth (same ink as the tree and bushes).  I found that it went on better when I just dabbed it with the sponge repeatedly.  


The very last thing I did before layering it and putting it on the card base was to rub off all of the frisket.  I had to make sure my ink was dry.  If it's not it will smear into all the nice white stars. :(  I usually use the edge of my sleeve since my fingers are oily and that smears it too (granted I usually have an old sweatshirt on when I'm doing this!).  I just carefully rub it off, then lightly run my fingers over it to see if I missed any spots. 


Thanks for looking and have a great day!

I would love to be your demonstrator! If you like what you see and want to order anything just click on any of the products that I've listed at the bottom of my blog or click on the "Shop Now" tab at the top of my blog. Any of them will take you directly to my website! If you have questions feel free to contact me. Just click "Contact Me" at the top of my blog . If you're thinking of becoming a demonstrator click "Join My Team". I'd love to have you join me!

Supplies used on this card:

Liquid Frisket

Built for Free Using: My Stampin Blog

Monday, February 8, 2016

The Wilderness Awaits in Silhouette

Today I'm going to say it's time for a masculine Monday card.  Only because it's Monday and I happen to have a masculine card to share with you. lol  I made this card for my brother's birthday last week and thought I'd share it since I do love making masculine cards. :)


I have to say I like the angle of this next pic because it makes the clouds across the moon stand out a  little bit more than the pic above. Now why did I put clouds across the moon?  I could say because I really like the look and it just adds to the card, but it's actually because I got a black streak across the top of the bright white moon!  Arrgg! lol  I wasn't happy about it at first after I did all my brayering, stamping, coloring in, shading and anything else I did!  However I think it did add to the card so I can't complain!


I like how this picture shows the light of the moon hitting the elk just right.  I used a white gel pen this get this effect.  I drew the lines on then used one finger to pull the still wet ink into the black to blend it in a little bit.   


What do you do when you make a long card?  Put a big stamp on the bottom of it!  I am just not a writer at all so I never know what to say in a card.  I'm not the sappy type and I don't want to use the same sentiment stamp over and over so just stamp something big on the inside, put a few birthday wishes in, sign it and it's good to go! :)


Thanks for looking and have a great day!
Sara

I would love to be your demonstrator! If you like what you see and want to order anything just click on any of the products that I've listed at the bottom of my blog or click on the "Shop Now" tab at the top of my blog. Any of them will take you directly to my website! If you have questions feel free to contact me. Just click "Contact Me" at the top of my blog . If you're thinking of becoming a demonstrator click "Join My Team". I'd love to have you join me!

Supplies used on this card:

Built for Free Using: My Stampin Blog

Sunday, November 29, 2015

Wonderland

Just a quick post for you today to show you the birthday card I made for my son.  He's 22 today!  I think the older I get the faster time goes!  Anyone else feel that way?  


Since I already had the stamp set Wonderland out on my craft table I decided I'd use it again.  I looked through a few sketches and decided to play along with one that I haven't done in quite a while...Hand Stamped Sentiments.  I have to admit I didn't follow the sketch exactly, but kind of did the gist of it. :)


Yup it's a pretty dark card, but I just love the way the blues look against the dark background so I'm sticking with it. :)


Thanks for looking and have a great day!
Sara

I would love to be your demonstrator! If you like what you see and want to order anything just click on any of the products that I've listed at the bottom of my blog or click on the "Shop Now" tab at the top of my blog. Any of them will take you directly to my website! If you have questions feel free to contact me. Just click "Contact Me" at the top of my blog . If you're thinking of becoming a demonstrator click "Join My Team". I'd love to have you join me!

Supplies used on this card:

Liquid Frisket (to make it look like a snowy or starry sky)
Built for Free Using: My Stampin Blog

Thursday, October 29, 2015

Silent Sleigh Ride

It's Thursday so that means I have another Christmas card for you.  How are you all doing on your Christmas card stash?  I'm not doing as well as I should be since I'm only making one card each time I post instead of four!  I need to get busy or my Christmas list is going to shrink drastically this year! 

Anywhoo...today's card is inspired by 'Tis the Season's color challenge of vanilla, coral, blue and razzleberry.  Wow was this a hard combo for me!  I'm not a big fan of orange and blue together at all (sorry Tigers' Fans!).  I paired up a couple of different blues and oranges and picked Calypso Coral and Marina Mist.  As you can tell I did NOT mix them, but used just a touch of the coral to outline my blue and razzleberry sky that I brayered.  I used vanilla cardstock to finish out my fourth color and am very pleased with the result. :)  Oh, I can't forget to add that I used liquid frisket to get the starry/snowy look in the sky.  I love using this stuff for that effect, but wow does it stink! lol  


Head over to 'Tis the Season HERE to be inspired by our design teams' Christmas cards.  So many different ideas using these colors.  Love seeing what everyone comes up with each time.  We'd love to see how you use these colors too so play along and build that Christmas card stash! :)


I have to admit I think the card looks prettier in person.  In the picture the sky almost looks dark blue or purple.  I guess the top is purple, but here it looks more like eggplant when it's really a razzleberry.  Does that make any sense? lol


Thanks for looking and have a great day!
Sara

I would love to be your demonstrator! If you like what you see and want to order anything just click on any of the products that I've listed at the bottom of my blog or click on the "Shop Now" tab at the top of my blog. Any of them will take you directly to my website! If you have questions feel free to contact me. Just click "Contact Me" at the top of my blog . If you're thinking of becoming a demonstrator click "Join My Team". I'd love to have you join me!

Supplies use on this card:

Liquid Frisket


Built for Free Using: My Stampin Blog


Tuesday, October 27, 2015

BOO!

Oops!!  So I totally forgot to post my card before I left on vacation to the Smoky Mountains!  Here I thought I was all set to go and I totally was NOT!  Today's card is inspired by the sketch at Try Stampin' or Not on Tuesday challenge #242.  It also has the theme of "Boo or Eek!".  I decided to do both since I don't mind making one or two Halloween cards each year. 


Boy did I have fun making this card.  I decided to make a huge moon on my card and use the banner for the sentiment, and of course put "Boo" in the bottom corner.  I used my brayer to get the colors on, then added the trees and extended the trunks so they weren't all the same size.  Next I did a little sponging on the moon so it wasn't quite so bright.  I stamped on the bats with black ink, but embossed the ghosts with white so they stood out. Make sure you check out the challenge from Try Stampin' or Not on Tuesday HERE to see all the other great cards!  Not everyone did the theme since that is optional. :)  Show us how this week's sketch inspires you...we'd love to see it!


Thanks for looking and have a great day!
Sara

I would love to be your demonstrator! If you like what you see and want to order anything just click on any of the products that I've listed at the bottom of my blog or click on the "Shop Now" tab at the top of my blog. Any of them will take you directly to my website! If you have questions feel free to contact me. Just click "Contact Me" at the top of my blog . If you're thinking of becoming a demonstrator click "Join My Team". I'd love to have you join me!

Supplies used on this card:

Retired Stampin' Up! set Holiday Home, Retired Thinlits Little Letters


Built for Free Using: My Stampin Blog

Tuesday, September 22, 2015

Blue, Blue and More Blue...

I have to say I sure do miss my laptop!!  I can't believe how much easier it is to post on my blog when I can do everything from one place.  We sure are spoiled by technology aren't we...that is until it decides to crash on us! lol  Anyway today I have  a couple of cards for you that I was challenged to make by my upline.  She wanted us to try the embossed scenic background technique...at least that's what she calls it. :)  I started working on it the other night and just got frustrated since it wouldn't emboss my whole background.  I set it down and figured I was too tired and needed to work on it another time.  So I picked it up the next morning and realized I just needed to put a shim under it when I ran it through my Big Shot, so that's what I did and I was good to go again. 


As you can see I decided to make two different card using the same colors.  Since I knew I needed a baby boy card I figured the stars would be the perfect background for that.  The second card is the one I was so frustrated with.  I ran it through a second time and got color on the trees, but decided I didn't really mind the look of it and went with it.  Can you see the huge mistake that I did make on the card and didn't correct before I took the pics?  I guess I was still too tired to work on it in the morning too! lol  I'll be changing that huge mistake before I send the card out! ;)


Thanks for looking and have a great day!
Sara

I would love to be your demonstrator! If you like what you see and want to order anything just click 
on any of the products that I've listed at the bottom of my blog or click on the "Shop Now" tab at the top of my blog. Any of them will take you directly to my website! If you have questions feel free to contact me. Just click "Contact Me" at the top of my blog . If you're thinking of becoming a demonstrator click "Join My Team". I'd love to have you join me!

Supplies used on this card:


Thursday, August 20, 2015

Christmas Sleigh Ride

I have a fun Christmas card to show you today that's inspired by the sketch challenge over at 'Tis the Season.  I made this card with some fun new stuff in the Stampin' Up! holiday catalog!  I couldn't wait to play around and see what I could come up with.  First of all I finally went out and bought some liquid frisket!  I've seen so many cards where it's been used and had to try it myself.  I can guarantee I'll be using more of since it will be great for Christmas and winter cards!  Second is the fun little scene you can create using the new edgelits.  I've already seen so many beautiful cards made with them, and I plan to add to what's already out there. :)


Make sure you head over to 'Tis the Season HERE to check out the other fun Christmas cards using this sketch and play along too.  We'd love to see what each of you create. :)


I loved the sketch for this challenge, but I have to say I did NOT love the way I decided to make the little curve at the top of my "rectangle", or that fact that I needed to line up the curves underneath the rectangle to where they are on the rectangle! lol  Why do I always do this to myself?  I have no idea, but when an idea pops into my mind I just have to get it on paper. :)


Thanks for looking and have a great day!
Sara

I would love to be your demonstrator! If you like what you see and want to order anything just click on any of the products that I've listed at the bottom of my blog or click on the "Shop Now" tab at the top of my blog. Any of them will take you directly to my website! If you have questions feel free to contact me. Just click "Contact Me" at the top of my blog . If you're thinking of becoming a demonstrator click "Join My Team". I'd love to have you join me!

Supplies used on this card:

Liquid Frisket

Built for Free Using: My Stampin Blog

Tuesday, June 30, 2015

Happy 20th Rachel!

Today's card was made special for my "baby".  She turned 20 yesterday and I had to make her something right?!  Since I love the new set from Stampin' Up! called Remarkable You I decided to use the water lily for her card (at least I think it's a water lily!).  I wanted lily pads to go with it too so I ended up making a stamp for that using the carving kit that I bought a while ago from Stampin' Up!  I don't believe it's available anymore, but I have to admit it did the trick!  It took a bit of time to carve the stamp out, but I think it was definitely worth it in the end.   My daughter said I carved a new stamp just for her.  Hmm...I don't know if I did it "just" for her because it's for me too! ;)  Hope you like today's card. :)


Thanks for looking and have a great day!
Sara

I would love to be your demonstrator! If you like what you see and want to order anything just click on any of the products that I've listed at the bottom of my blog or click on the "Shop Now" tab at the top of my blog. Any of them will take you directly to my website! If you have questions feel free to contact me. Just click "Contact Me" at the top of my blog . If you're thinking of becoming a demonstrator click "Join My Team". I'd love to have you join me!

Supplies used on this card:

Versa Marker

Built for Free Using: My Stampin Blog