Wow, I'm a little slow this week putting anything on my blog. :( Yup, it's been a busy week, but I must admit it's nice to take a little break every now and then. Today I decided to post a "box" instead of my usual card. I've been seeing a lot of beautiful cards lately that are 3-D...I've even made a few myself. But I've been wondering how are you suppose to give those kind of cards away? I don't want to hand a card to someone that's not in an envelope, but they don't fit in them! I started looking around for tutorials for boxes and figured with all the time I spent looking I could be busy making something. So that's what I did, and this is what I came up with for a card I made earlier for a challenge.


Tuck the next corner in and repeat steps until finished with the top and the bottom of the box.
Here is the finished box.


A picture with the box all set to give away. Still not sure how I'd mail this though. You'd think with my husband working for the Post Office I'd have something up my sleeve!

I had to show a picture with the card inside the box.

And finally a close up of the flowers.
Thanks for looking and have a great day!
Here are the instructions for the box.
You will need two pieces of card stock cut to 8 1/2" x 8 1/2".
The bottom needs to fit the 5 x 5 card so I want the bottom of the box to measure 5 1/4" x 5 1/4". I scored my paper at 13/16" all the way around, then I scored it at 1 5/8". Your card stock should look like this... Just click on the picture to make it bigger if you can't see the score lines.

Now the top of the box needs to be slightly larger than the bottom to fit over it. I need that to measure
5 3/8" x 5 3/8". I score this one at 25/32" all the way around, then I scored it at 1 9/16". Your card stock should look like this...

Yes, these are strange measurements, and the score lines look the same, but they are slightly different and do work. :)
Now you need to fold each of the score lines.

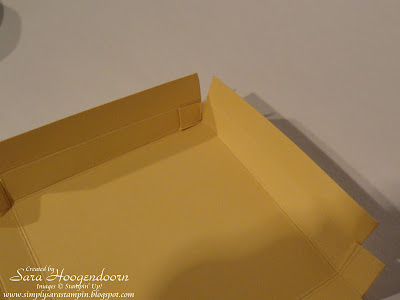
Now cut the corners like shown.

Now use sticky strip to adhere your first flap like shown.

Now fold the flap over the corner piece and adhere. I used two-way tape all the way along the edge for this part. Once your tape is on, fold the flap over pressing in the middle first and work your way out to each edge making sure it's nice and tight.

Here is the finished box.


How can you stand to give away such beautiful
ReplyDeletecreations? (I know you have a talent from God and use it to bless others!)
Love this box and card...so lovely!
Hugs, Dawn